Content Pillars to Clicks: Structuring Your Liinks Page Around What Your Audience Actually Wants

Your link in bio shouldn’t be a junk drawer of “everything I do.” It should feel like a clear, calm hallway with doors that lead to exactly what your audience came for.
That’s where content pillars come in.
When you build your Liinks page around a few intentional pillars—rather than a random list of links—you turn curiosity into clicks, and clicks into subscribers, clients, and customers.
In this guide, we’ll walk through how to:
- Identify what your audience actually wants from you
- Turn those needs into 3–5 clear content pillars
- Translate each pillar into a focused, conversion-ready section on your Liinks page
- Keep everything updated without rebuilding your page from scratch every week
Why Content Pillars Matter for Your Link in Bio
Most creators and small businesses make the same mistake: they treat their bio link as a directory instead of a strategy.
That usually looks like:
- 15+ links with no clear order
- Confusing labels like “New!” or “Check this out”
- Important actions (shop, book, subscribe) buried under less important ones
The result? People tap your bio link, feel overwhelmed, and bounce.
Content pillars fix this by:
- Clarifying your priorities. You decide what matters most—email list, offers, content, community—and build around that.
- Reducing decision fatigue. Visitors see 3–5 obvious paths instead of 20 competing options.
- Making optimization easier. When your Liinks page is structured, you can tweak one pillar at a time instead of guessing.
If you’ve ever felt like your content is strong but your results don’t match, your structure—not your effort—might be the issue. That’s exactly what we dig into in posts like From One Link to a Full Funnel: Turning Your Liinks Page into a 24/7 Sales Machine. This article zooms in on the foundation of that funnel: your pillars.
Step 1: Figure Out What Your Audience Actually Wants
Before you rearrange a single link, you need to know what people are hoping to find when they tap your bio.
Here are four simple ways to get that clarity.
1. Look at Your Existing Data
Use the analytics you already have:
- Social insights: Which posts get saves, shares, replies, and click-throughs?
- Liinks analytics: Which links are getting the most taps right now?
- Email & shop data: Which lead magnets, products, or services are consistently performing?
Patterns here tell you what your audience votes for with their clicks.
2. Map Content → Intent
For your top-performing posts, ask:
- What problem is this solving?
- What promise is it making?
- If someone loved this post, what would they reasonably want to do next?
Example:
- A TikTok about “3 ways to batch Reels” → they might want a content calendar, editing tutorial, or coaching call.
- An Instagram carousel on “how to price your services” → they might want a pricing template, workshop, or 1:1 strategy session.
We go deeper on this content → action connection in Carousel to Checkout: Turning Instagram Posts into Sales with a High-Converting Liinks Page.
3. Ask Directly (and Keep It Low-Friction)
Use:
- Story polls: “What do you tap my bio link for most often?”
- Question stickers: “If I could add one thing to my bio link for you, what would it be?”
- Simple DMs: “Hey, quick question—what do you usually look for when you hit my link in bio?”
You don’t need a giant audience for this to work. Even 10–20 thoughtful responses can reveal clear themes.
4. Decide What You Want, Too
Audience desire matters—but so do your goals.
Ask yourself:
- What are the 1–2 outcomes that matter most this quarter? (Email growth, course sales, booked calls, newsletter sponsors, etc.)
- What actions on my Liinks page directly support those outcomes?
Your content pillars should sit at the intersection of:
What people keep asking you for
+ what moves your business forward.
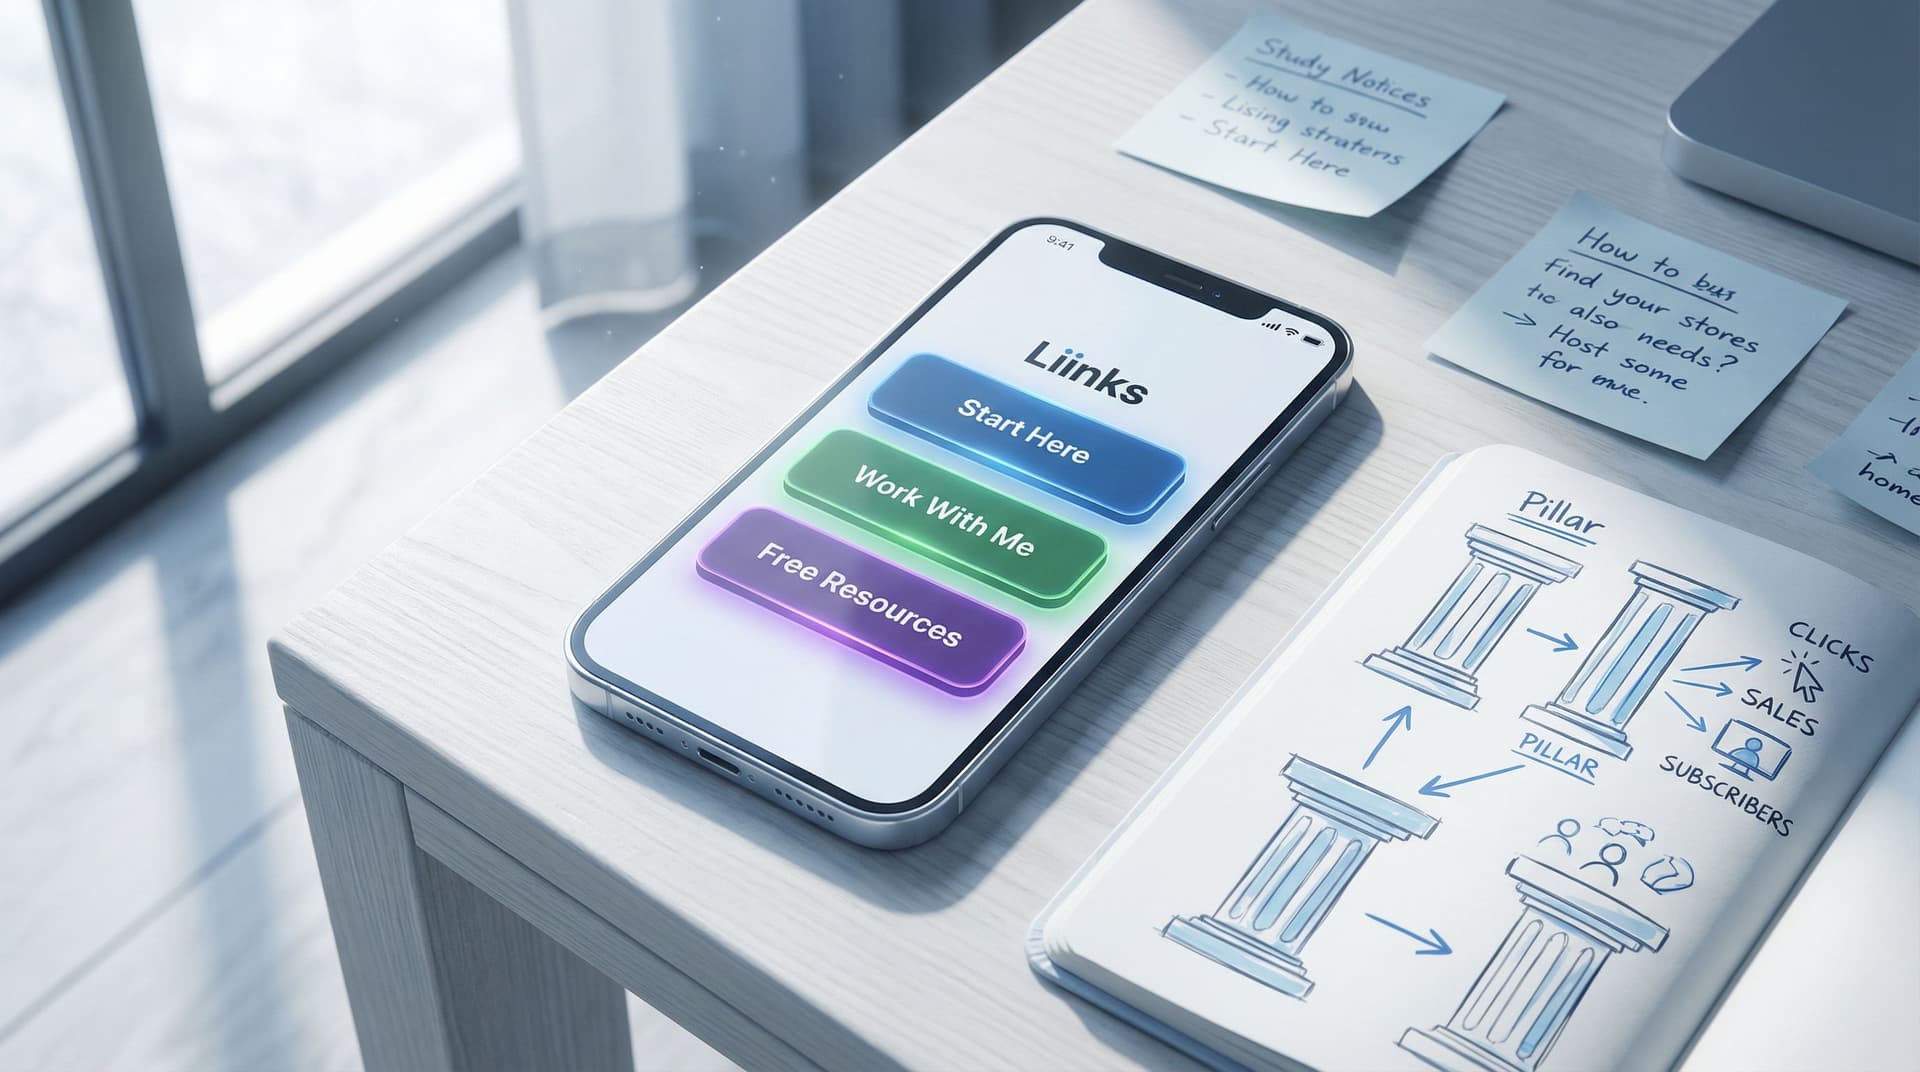
Step 2: Choose 3–5 Core Content Pillars
Once you understand what people want and what you need, you can group everything into 3–5 content pillars.
Think of pillars as themes of value, not just link categories.
Here are some common pillar types, with examples:
- Learn with Me (Education)
- Free guides, tutorials, YouTube playlists, blog posts, live replays
- Work with Me (Offers & Services)
- Services, 1:1 calls, applications, coaching, done-for-you packages
- Shop My Stuff (Products)
- Digital products, templates, presets, physical products, merch
- Join My Inner Circle (Community & Email)
- Newsletter, waitlists, Discord/Slack, memberships, Patreon
- Start Here (Orientation)
- Best-of content, “start here” guide, about page, case studies
You don’t need all of these. Pick the ones that:
- Match your current business model
- Reflect how people actually use your content
- You can confidently support with real offers or resources
Good rule of thumb: 3–5 pillars, each with 1 “hero” action and 1–3 supporting links.
Step 3: Turn Pillars into a Clear Liinks Layout
Now let’s translate those pillars into an actual Liinks page that people can’t help but click.
1. Lead with Your Primary Conversion Goal
The top of your page is prime real estate. Use it intentionally.
Ask: If someone only spends 5 seconds on this page, what’s the ONE thing I want them to do?
That becomes your primary pillar, visually highlighted and placed near the top.
Examples:
- List builders: “Get My Weekly Creator Playbook” (newsletter signup)
- Service providers: “Book a Strategy Call” (booking link or form)
- Product-based brands: “Shop the New Collection” (featured collection or product)
Then, use Liinks design tools—buttons, spacing, colors—to make this stand out.
2. Group Links Under Pillar Headings
Instead of a flat list of links, create sections that mirror your pillars. For example:
- Start Here
- New? Watch this 3-minute intro
- My story & case studies
- Work With Me
- 1:1 Strategy Intensive (most popular)
- Ongoing mentorship
- Free Resources
- Content calendar template
- Pricing cheatsheet
- Shop
- Reels hook bank
- Notion business dashboard
Use short, descriptive titles for each section. Avoid inside jokes or vague labels like “Fun stuff” or “Random links.”
3. Write Copy That Mirrors the Promise of Your Content
People clicked from a specific piece of content with a specific promise. Your Liinks page should feel like a continuation of that promise.
Use:
-
Benefit-first button labels
- “Steal my Notion content hub” instead of “Notion template”
- “Land your first 5 clients” instead of “Client guide PDF”
-
Micro-descriptions under key links
- “Free 15-minute training: how I batch 30 Reels in one afternoon”
- “The exact email I send to pitch brand deals (copy + paste)”
This is where a design-forward approach pays off. If you want help making it look as good as it performs, check out Design-First Link in Bio: How to Build a Stunning Liinks Page That Actually Converts.
4. Use Visual Hierarchy to Guide Clicks
Inside Liinks, you can:
- Make your primary CTA a bigger, bolder button
- Use accent colors for priority links
- Add subtle dividers between pillars
- Use icons or emojis sparingly to signal categories (e.g., 🛒 for Shop, 🎓 for Learn)
The goal: even if someone only skims, they instantly see what to do.
Step 4: Align Each Pillar with a Clear Next Step
A pillar isn’t just a theme—it’s a path.
Every pillar on your Liinks page should lead somewhere specific:
- Learn with Me → YouTube playlist, blog series, or free workshop replay
- Work with Me → Application form, booking calendar, or services page
- Shop → Featured collection or bestsellers, not just a generic homepage
- Join My Inner Circle → Email signup, membership landing page, or community invite
For each pillar, define:
- Primary action: the main thing you want someone to do (buy, book, join, watch).
- Proof or context (optional but powerful): a testimonial, case study, or “what to expect” link.
- Low-commitment option: a freebie, preview, or mini resource for people who aren’t ready yet.
Example for a business coach:
- Pillar: Work With Me
- Primary: “Apply for 1:1 Coaching”
- Proof: “Read client wins & case studies”
- Low-commitment: “Book a 15-minute fit call”
This creates a mini funnel inside your Liinks page.
Step 5: Make Your Page Dynamic Without Making It Chaotic
Your audience’s priorities shift throughout the year—launches, holidays, promotions, and seasons all change what they’re looking for.
You want your Liinks page to adapt without losing its underlying structure.
Keep the Pillars, Swap the Links
Instead of rebuilding everything, keep your pillars steady and rotate what sits under them.
Example:
- Pillar: Shop My Stuff
- Normal week: bestsellers, evergreen products
- Launch week: new course at the top, bestsellers below
- Holiday season: bundle or gift guide featured first
For more inspiration on this kind of agile setup, take a look at Seasonal Campaigns with Liinks: Simple Link-in-Bio Swaps that Drive Holiday Revenue.
Create a Simple Update Rhythm
Set a recurring reminder—weekly or biweekly—to:
- Check Liinks analytics
- Remove links that are no longer relevant
- Promote what’s actually current (next workshop, active discount, open waitlist)
Ask yourself:
If a new follower clicks my bio link right now, does this page reflect what I’m currently excited for them to do?
If not, adjust.
Step 6: Connect Your Content Directly to Your Pillars
Your Liinks page shouldn’t exist in isolation. It should be the natural next step from your content.
Map Each Content Type to a Pillar
Create a simple cheat sheet:
- Educational Reels / TikToks → Learn with Me pillar
- Behind-the-scenes stories → Work with Me pillar
- Product showcases → Shop pillar
- Personal or community posts → Join My Inner Circle / Start Here pillars
Then, in your captions and CTAs, reference the exact path:
- “Want the full tutorial? Hit the link in my bio and tap ‘Learn with Me’ → ‘Reels batching workshop’.”
- “If you’re nodding along, go to my bio and click ‘Work with Me’ to apply for coaching.”
The clearer your instructions, the more likely people are to follow through.
Use Consistent Language Across Platforms
If you call it “Start Here” on your Liinks page, use the same phrase in your posts and stories. Consistency builds familiarity—and familiarity builds clicks.
Step 7: Measure, Refine, Repeat
Once your pillars are in place, your job isn’t “done”—it just gets simpler.
Use your Liinks analytics to answer:
- Which pillar sections get the most taps?
- Within each pillar, which specific links are top performers?
- Are people engaging with your primary goal (e.g., email signups, bookings), or are they gravitating elsewhere?
Based on what you see, you can:
- Move high-performing links higher within their pillar
- Test new button copy for underperforming links
- Swap out offers or resources that aren’t getting traction
Think of your Liinks page as a living asset. Small monthly tweaks compound into big gains over time.
Example: A Simple Pillar Layout You Can Steal
Here’s a plug-and-play structure you can adapt for your own Liinks page.
Top Section:
- Big headline: “Turn Your Content into Clients”
- Subhead: “Choose what you need most right now.”
Pillar 1 – Start Here
- “New? Watch my 3-minute intro”
- “See client results & case studies”
Pillar 2 – Work With Me
- “Apply for 1:1 coaching (limited spots)”
- “Book a 15-minute fit call”
Pillar 3 – Free Resources
- “Steal my content planning template”
- “Pricing cheatsheet for new service providers”
Pillar 4 – Shop My Templates
- “Client onboarding Notion hub”
- “Reels hook bank (200+ prompts)”
Pillar 5 – Join My Inner Circle
- “Weekly newsletter: creator business breakdowns”
- “Private community waitlist”
From there, you can adjust labels, offers, and priority based on your niche.
Bringing It All Together
When you structure your Liinks page around content pillars, you:
- Stop treating your bio link like a random list of URLs
- Start guiding people through a clear, intentional path
- Make it easier for visitors to find what they came for—and what you most want to offer
The shift is subtle but powerful: from “Here’s everything I do” to “Here’s exactly where to go next.”
Your Next Step
You don’t need a full rebrand or a massive audience to make this work. You just need to:
- Choose 3–5 content pillars based on what your audience wants and what you’re building.
- Restructure your Liinks page so each pillar has its own clear section and primary action.
- Commit to a simple review rhythm so your page always reflects what matters right now.
If you’re ready to turn your one tiny bio link into a focused, conversion-ready hub, log into Liinks and:
- Rename your sections to match your pillars
- Promote one primary CTA at the top
- Remove at least 3 links that no longer serve a clear purpose
Give yourself 30 minutes to do this.
Your content is already working hard. A pillar-based Liinks page makes sure every click has somewhere meaningful to go.


